Chapter 0 - Setup
The purpose of this chapter is to setup a development environment to start working on our universal app. We will cover Webpack, Babel, PostCSS, ESLint and we will create a DevServer.
Branch: To see the commits of this chapter checkout this branch.
Release: To skip this chapter just clone this release.
Init
Go ahead, create a new directory and jump in
mkdir universal-app && cd universal-app
Initialize a git repository
git init
Create a new branch setup
git checkout -b setup
Set node version to v6
nvm install 6 && nvm use 6
Add a README
echo 'Javascript Universal App' > README.md
Initialize npm (go thru the interactive setup)
npm init
Ignore node_modules
echo node_modules > .gitignore
You are all set!
Diff: to see the diff for this step click here.
Fast-forward: git clone --branch init https://github.com/cazala/universal-app.git --depth=1
Webpack
Webpack is a widely used module bundler, and the first thing to setup
npm install webpack —-save-dev
First create a /src and /dist directories
mkdir src && mkdir dist
Save the following file as webpack.config.js
var webpack = require('webpack')
var path = require('path')
module.exports = {
  context: __dirname,
  entry: './src/index.js',
  output: {
    path: path.resolve('dist'),
    filename: 'bundle.js',  },
    plugins: [ new webpack.NoErrorsPlugin() ],
    resolve: {
      extensions: ['', '.js', '.json'],
      modulesDirectories: ['.', 'src', 'node_modules']
    }
  }
}
Add /dist to the .gitignore file
node_modules
dist
Add build and start scripts to your package.json
"build": "webpack --config webpack.config.js",
"start": "node dist/bundle.js",
Test It Out:
Create the following index.js file inside /src:
console.log('hello world')
Now just npm run build and then npm run start
You should see a hello world in your console, and you will find that you 1 line src/index.js has become a 51 lines dist/bundle.js. Yay... right? This will pay off in the future tho, as we start plugging stuff into webpack.
Diff: to see the diff for this step click here.
Fast-forward: git clone --branch webpack https://github.com/cazala/universal-app.git --depth=1
Babel
Babel is a JavaScript compiler. It extends the language capabilities thru syntax transformers, we will need this in order to use ES2015 and React.
Get ready to install a truckload of dependencies
npm install --save babel-core babel-plugin-jsx-display-if babel-plugin-transform-object-rest-spread babel-polyfill babel-preset-es2015 babel-preset-react babel-register babel-runtime babel-loader
Add .babelrc to configure babel
{
  "presets": ["es2015", "react"],
  "plugins": [
    "transform-object-rest-spread",
    "jsx-display-if"
  ]
}
And finally add loader to webpack.config.js so webpack transpiles all the .js files using babel (except the ones in node_modules)
module: {
  loaders: [
    {
      test: /\.js$/,
      loaders: ['babel'],
      exclude: /node_modules/
    }
  ]
}
Test It Out:
Save the following as your src/index.js
const obj = { a: 1, b:2, c:3 }
const { a, ...rest } = obj
const spread = { ...rest, d: 4 }
console.log(rest) // { b:2, c: 3}
console.log(spread) // { b:2, c: 3, d: 4 }
Now npm run build and npm run start and you should see the rest and spread operators working (thus, babel is working)
Diff: to see the diff for this step click here.
Fast-forward: git clone --branch babel https://github.com/cazala/universal-app.git --depth=1
PostCSS
PostCSS is a tool for transforming CSS with JavaScript, like a Babel for CSS. We will set it up to let us work with autoprefixer, css modules (localized css classnames), css nesting, css variables and what not.
Again, get ready for installing a bunch of deps:
npm install --save-dev autoprefixer css-loader style-loader postcss-import postcss-loader postcss-mixins postcss-nested postcss-simple-vars
Add loaders to webpack.config.js so webpack loads all the .css and .scss files with style, css and postcss loaders.
This way we will be able to require(./styles.css)
style-loader: It adds a
<style>tag to the<head>with the loaded style.css-loader: It transform the css file with localized classnames (aka CSS Modules), applies minification and source-maps.
postcss-loader: It lets us use transformation plugins like
autoprefixer,import,nested, andsimple-vars, to have a sass\/less similar experience.
So lets add the loaders:
{
  test: /(\.scss|\.css)$/,
  loaders: ['style', 'css?sourceMap&modules&importLoaders=1&localIdentName=[name]__[local]___[hash:base64:5]', 'postcss']
}
Add the postcss plugins:
postcss: [
  require('autoprefixer'),
  require('postcss-import'),
  require('postcss-nested'),
  require('postcss-simple-vars')
]
And add the extensions to resolve.extension
extensions: ['', '.js', '.json', '.css', 'scss'],
Test It Out:
Add the following index.css to /src
.red {
  color: red;
}
Add the following index.js to /src
import styles from './index.css'
console.log(styles) // { red: '...' }
window.onload = () => document.body.classList.add(styles.red)
And finally add this index.html at the root level (not to /src)
<script src='./dist/bundle.js'></script>
<body>Hello World</body>
Now run npm run build and open index.html
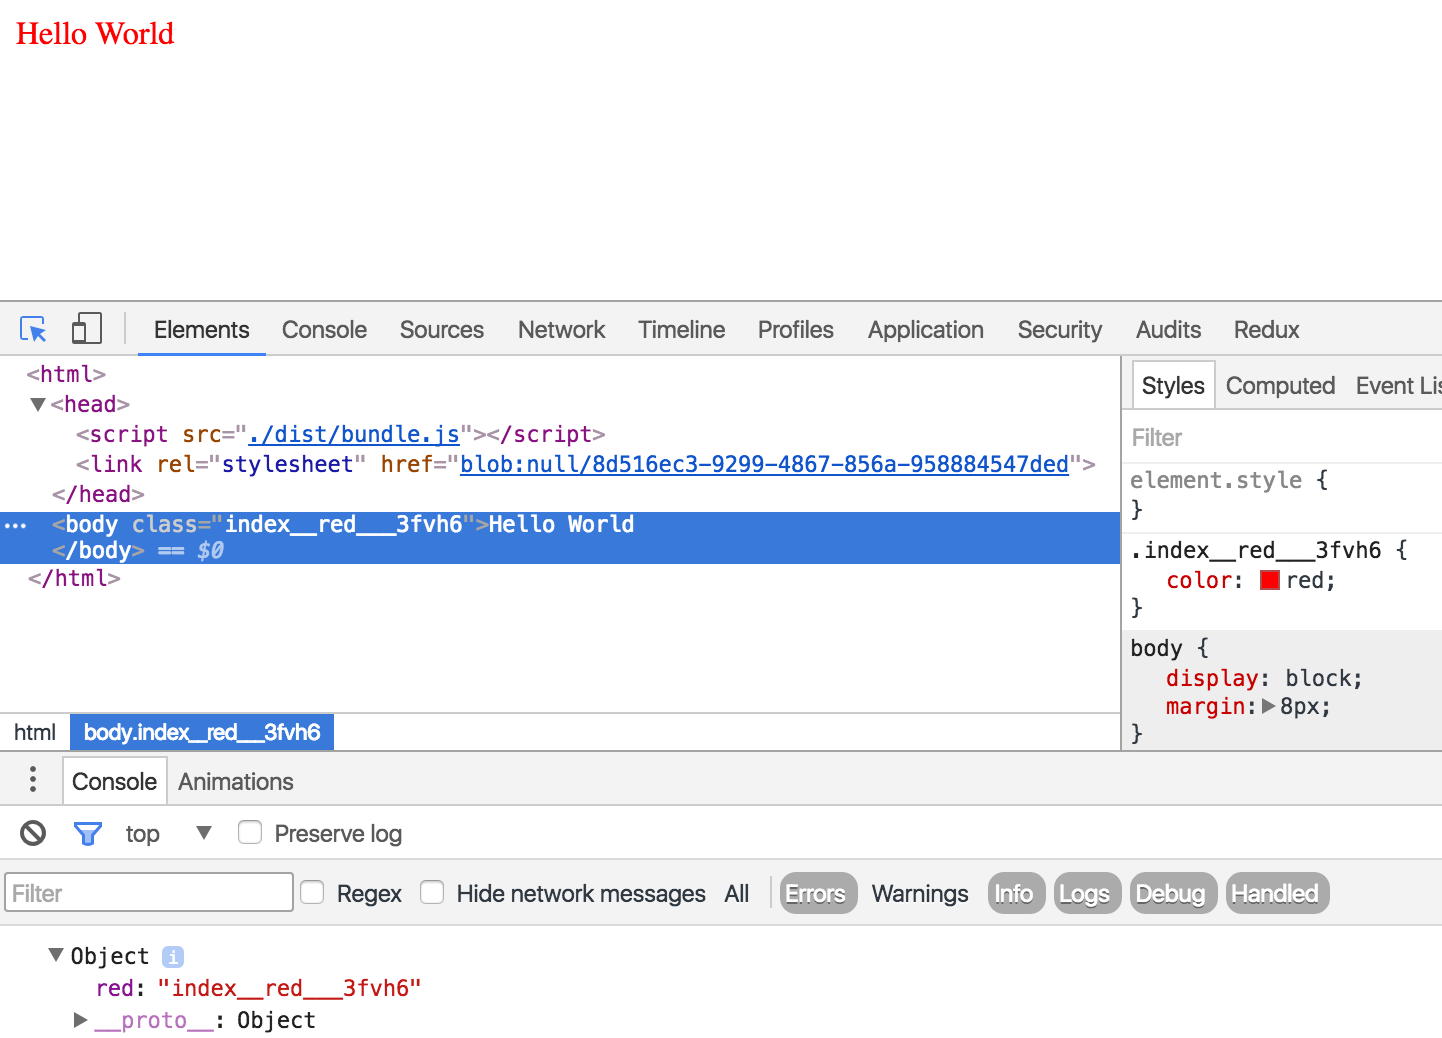
You should see that a <style> tag was added to the <head> with our css file, and the localized css classname index__red___3fvh6 was applied to the <body>, making the Hello World be red.
Diff: to see the diff for this step click here.
Fast-forward: git clone --branch postcss https://github.com/cazala/universal-app.git --depth=1
ESLint
ESLint is a lint utility that will help us debug at coding time and write consistent code.
Yet again, another bigass npm install:
npm install --save-dev eslint babel-eslint eslint-config-standard eslint-config-standard-react eslint-plugin-babel eslint-plugin-import eslint-plugin-jsx-a11y eslint-plugin-promise eslint-plugin-react eslint-plugin-standard eslint-watch
Add a .eslintrc file to configure the linter, this is an example of the coding style that I use, but you can configure it to your needs, and there are tons of eslint plugins that you can choose from in npm:
{
  "env": {
    "browser": true,
    "node": true
  },
  "parser": "babel-eslint",
  "extends": ["standard", "standard-react"],
  "rules": {
    "comma-dangle" : [0, "always-multiline"],
    "semi": [2, "never"],
    "no-extra-semi": 2,
    "jsx-quotes": [2, "prefer-single"],
    "react/jsx-boolean-value": [0, "always"],
    "react/jsx-max-props-per-line": [2, {"maximum": 4}],
    "react/self-closing-comp": 2,
    "react/jsx-indent-props": [2, 2],
    "react/sort-comp": 2
  }
}
Test It Out:
Now, save the following as your src/index.js
const a = 1
const b = 2
const c = 3 // unused variable
console.log(a + b)
(also, you can delete the /index.html and /src/index.css from previous step if you still have them)
So now if you open src/index.js with an editor with eslint support (like Atom + Linter + ESLint Plugin) it should be working:

Diff: to see the diff for this step click here.
Fast-forward: git clone --branch eslint https://github.com/cazala/universal-app.git --depth=1
DevServer
Finally, we will create a development server that will watch for changes in our files as we develop and serve them thru a web server, so we can see our work and debug as we code
npm install --save express
npm install --save-dev webpack-dev-middleware webpack-hot-middleware
Add the following file as dev-server.js:
var webpack = require('webpack')
var webpackDevMiddleware = require('webpack-dev-middleware')
var webpackHotMiddleware = require('webpack-hot-middleware')
var config = require('./webpack.config.js')
var Express = require('express')

var app = new Express()
var port = process.env.PORT || 9999
var compiler = webpack(config)
var dev = webpackDevMiddleware(compiler, { noInfo: true, publicPath: config.output.publicPath })
var hot = webpackHotMiddleware(compiler)

app.use(dev)
app.use(hot)

app.get('*', function (req, res) {
  res.send(`
    <html>
      <head>
        <title>Webpack Development Server</title>
      </head>
      <body>
        <div id="root">Hello World</div>
      </body>
      <script src="/bundle.js" async defer></script>
    </html>
  `)
})

app.listen(port, (error) => {
  if (error) { console.error(error) return }
  console.info('Open up http://localhost:%s/ in your browser.', port)
})
Add a devtool property to webpack.config.js to generate source maps
devtool: 'cheap-module-eval-source-map',
Add webpack-hot-middleware's client to your webpack.entry list
entry: [
  'webpack-hot-middleware/client',
  './src/index.js'
],
Add a public path to your webpack.output, that's where the Express will serve the bundle.
output: {
  path: path.resolve('dist'),
  filename: 'bundle.js',
  publicPath: '/'
}
Add webpack's HotModuleReplacementPlugin to your webpack.plugins
plugins: [
  new webpack.HotModuleReplacementPlugin(),
  new webpack.NoErrorsPlugin()
],
You can also remove src/index.js if you still have it from previous step
Finally, add a script to your package.json's scripts to start the dev-server
"dev-server": "node dev-server.js",
Test It Out:
Just npm run dev-server and open up localhost:9999, you should see a Hello World
Diff: to see the diff for this step click here.
Fast-forward: git clone --branch dev-server https://github.com/cazala/universal-app.git --depth=1